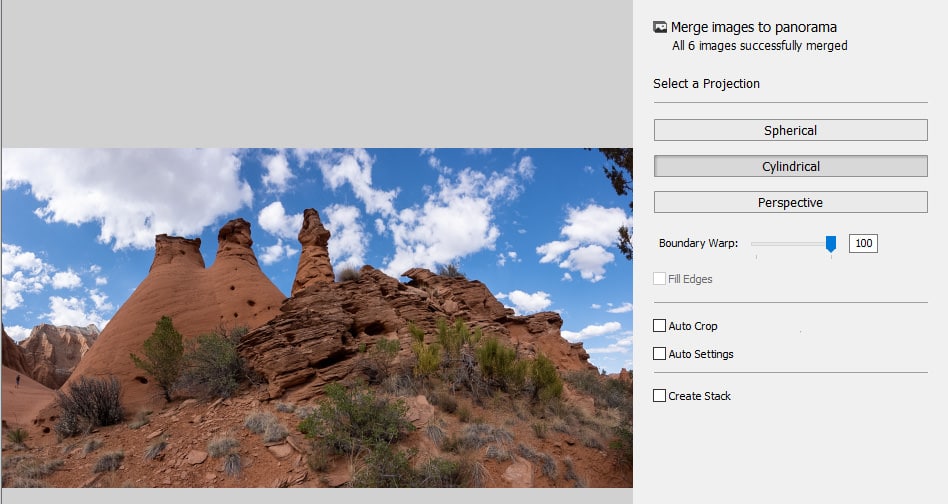
On my recent adventure along the Panorama Trail in Kodachrome Basin State Park, Utah, I captured this stunning shot, which turned out to be a real photographic challenge. Despite not having planned to tackle such a demanding shot, the experience taught me invaluable lessons on how to deal with landscape photography under difficult conditions. Here’s a breakdown of my journey and the techniques I used to capture and process this wide-angle panorama.
Panorama Trail Adventure in Kodachrome Basin
The Panorama Trail is one of the most scenic routes in Kodachrome Basin State Park, Utah, offering expansive views of the park’s unique rock formations. The trail spans 10 miles (16 km) through rugged terrain, climbing to 6,500 feet (2,000 meters) above sea level. During my hike, the temperature soared to around 90°F (30°C), adding a layer of physical challenge to the experience.
Carrying only my Fujifilm XT2 camera with a Fujinon 18-135mm lens, I kept my gear light, focusing on capturing the vast beauty of the landscape. While I didn’t anticipate shooting at sunset, I ended up snapping a series of stunning images—each one showcasing the awe-inspiring surroundings.
The Problem: Capturing the Secret Passage
As I reached the Secret Passage, a narrow area surrounded by towering rock formations, I realized that the scene was too vast to capture with my standard lens. The tight space left little room for movement, and I needed an ultra-wide angle perspective to properly frame the composition. With no wide-angle lens in hand, I decided to take multiple shots and stitch them together in post-processing.
This method, known as creating a panorama, involved shooting several individual images, each capturing a portion of the scene. Later, I merged them using Lightroom or Photoshop to create one cohesive wide-angle image. Although challenging, this technique proved effective and enabled me to capture the full grandeur of the area.
Shooting the Panorama: A Step-by-Step Process
The rock formation I aimed to photograph was in a confined area, which made setting up the shot tricky. I was almost close enough to touch the subject, with very little space to maneuver. Initially, I planned to capture just three to four shots to create the panorama. However, I soon realized that I needed more to fully capture the scene.
In the end, I took six vertical shots, each one slightly overlapping the previous, to ensure enough data to create a seamless panorama. I shot handheld, as there wasn’t enough room to use a tripod, but I carefully minimized camera movement to maintain consistency across the frames.
Before taking the series of shots, I made sure to lock the exposure (AE-L) and autofocus (AF-L) to ensure uniformity across all images. This technique prevented variations in brightness or focus between the shots, which could disrupt the final panorama.
Editing the Panorama: Lightroom & Photoshop Workflow
After capturing the images, I moved on to post-processing, which involved merging the individual shots into a single wide-angle image. Here’s how I processed the panorama:
Lightroom Workflow
I began by selecting all six images and sending them to Lightroom’s Photo Merge module. I selected the Panorama option to automatically align and blend the images into one seamless shot.

After merging, I used the Crop Overlay tool to adjust the image to a 16:9 aspect ratio, ensuring a balanced and professional composition. For the editing, I applied my “Napa” preset from my upcoming Travel Pro Kit Collection, which I used as a base for my Lightroom Rapid Editing technique. I then used the TOOLKIT in Lightroom to balance exposure and boost contrast, bringing out the vibrant colors of the landscape.
The Lightroom preset editing formula I used was: Napa (2, 9, 13, 20, 32), which helped enhance the overall dynamic range and color depth of the panorama.
Photoshop Refinements
In Photoshop, I performed final touch-ups to ensure the image was flawless. I used the Spot Removal tool to clean up any imperfections or distractions from the shot. Additionally, I applied the Topaz DeNoise plugin to reduce digital noise and sharpen the image, particularly useful for the high-resolution details of the panorama.
This was my first time using the updated DeNoise AI version, which offers better noise reduction and enhanced sharpness compared to the older version. The results were remarkable, leaving me with a crisp, clean image that showcased the full beauty of Kodachrome Basin.
Before & After: The Transformation
Here’s a look at the transformation, showcasing the difference between the raw image and the final, edited panorama:

Final Thoughts
The hike along the Panorama Trail in Kodachrome State Park was an unforgettable experience. While the conditions were challenging, the ability to create wide-angle panoramas through careful shooting and editing allowed me to capture the sweeping beauty of the landscape in a way that a single lens could not. The process taught me valuable lessons about landscape photography, particularly how to work with tight spaces, minimal gear, and the power of post-processing to enhance your images.
If you’re looking to take your landscape photography to the next level, mastering panorama shooting and editing is a must. By using techniques like multi-shot exposures and powerful editing tools like Lightroom and Photoshop, you can create stunning wide-angle images that showcase the full grandeur of the scene in front of you.

